How To Move a Stand Alone WordPress Website to WordPress Multi Site with Images
A few months ago I decided to switch to WordPress Multi Site. After reading the updated documentation, I felt the CMS software had matured enough to implement this option. Of course, the implementation was pretty straightforward and I had to do a lot of DNS fixing for the domains that I wanted to bring over – most of them were new websites that I easily set up.
However, there are a few WordPress installations on my site that are still separate from MS. The reason why – they were bulky and moving them over might be a major pain. I was right, too.
Over the weekend I decided to make one major change to Geekazine – bring the show iPad365 out of Geekazine and onto its own website. That way it can catalog better and I can customize the site for iPad365. However, it wasn’t a great experience.
This documentation was created and implemented with WordPress 3.6.
Rule #1: DON’T Use WordPress Importer
Whether pulling parts from one WordPress install or just moving over the whole website, I found more headaches in the WordPress Export/Import tools. I searched around to find a way to bring it all over, images and posts. Even the “Featured Image” which seems to be a favorite option from most WordPress themes. However, the WordPress Import tool does not bring that information over.
What does this tool do? It basically keeps all the images in their original place (even though you choose to import images) and doesn’t even fix the links. When I moved over Day in Tech History a couple years ago to its own WordPress install, I had this problem as well.
The documentation tells you to increase your cache sizes to accommodate. At the end of the day it doesn’t matter what your file size limits are – the images just won’t import over.
How to Import a WordPress website into Multi Site with Images and Taxonomies.
Want to keep the post information? Tags, Categories, post counts and everything? This isn’t a clean way to do it. In the end, you will have your posts on the new website.
First, a Disclaimer:
You are doing this at your own risk. I am only giving you an idea of what I did to bring my websites over. If you do this, you cannot hold me accountable.

Step 1: BACKUP EVERYTHING
We will be working with MySQL. Backup your site. Backup the images, the SQL database and anything else which pertains to this transfer.
Step 2: Setup WordPress EXACTLY the Same
It is best to try and re-create your website with all plugins and settings. If you planned to not bring a plugin over, then make sure it won’t mess with the environment in the end.
POWERPRESS USERS – If you are a podcaster and user Blubrry PowerPress, then set up your Powerpress settings exactly the way they were on the old site. When you do this import, these setting will come over, too. Having the categories set up properly will bring the data over.
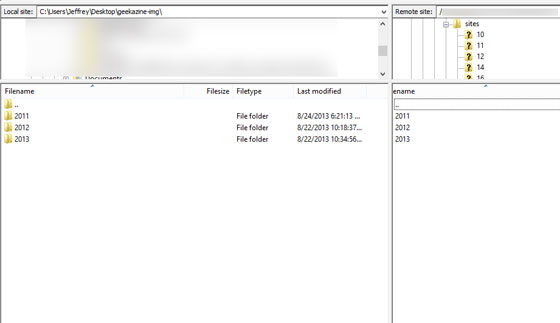
Step 3: Copy and Paste Images to the wp-contents/uploads/sites/xx folder
You will have to manually move your images from one location to another – there is no way around it. In the end, you will have fully attached images.
Find your Multi Site number for this child site: When you set up the child site, it gets a number – incrementing from 1. In iPad365s case, it was 20. So all my images went to www.ipad-365.com/wp-content/uploads/sites/20/. From there, you will have a year/month/image.ext structure.
This number will be needed again, so write it down.
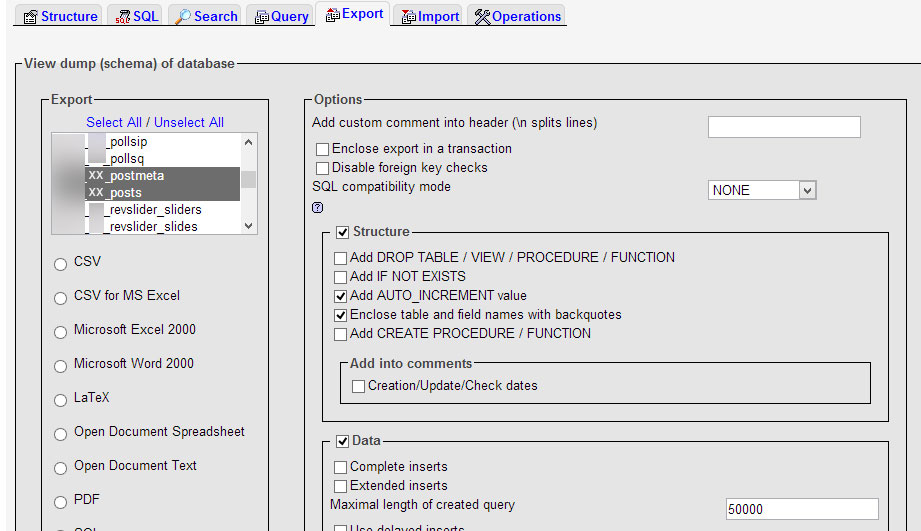
Step 4: Export WordPress Tables
Here is the fun part and where you have to work on the back-end. You can definitely bring over as many tables that you want. There are 5 that we are most interested in.
- wp_postmeta
- wp-posts
- wp_terms
- wp_term_relationships
- wp_term_taxonomy
You may have setup your WordPress for an alternate prefix. Maybe instead of wp_posts you have web_posts or {domain}_posts or even something else. Some WordPress gurus say having a different prefix is a good idea security-wise. Keep in mind the prefix you have on the old website and what you are moving to the new website. We will fix that as we go.
I am using the standard phpMyAdmin interface for SQL transactions. I simply exported the 5 tables I mentioned above and saved them to a file on my desktop.
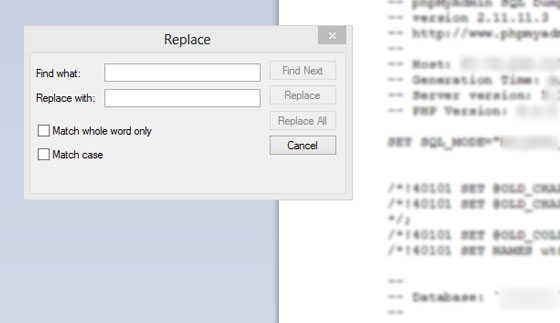
Step 5: Find and Replace
These files can be huge, so make sure you have an editor that can search and replace thousands of entries. I started with DreamWeaver but the replace process was way too slow. Since I am on my Windows machine, I used Wordpad to make the replacements.
NOTE: Make sure you are using the same Unicode. If the old database is UTF-8, your new database should also be that. Otherwise, you might get into some sticky situations.
Here is where you need your multi site number again (referred to as XX). You will open up your SQL file (or files, depending on how you downloaded the tables) and do a search-replace on the following:
- wp_postmeta = wp_XX_postmeta
- wp_posts = wp_XX_posts
- wp_terms = wp_XX_terms
- wp_term_relationships = wp_XX_term_relationships
- wp_term_taxonomy – wp_XX_term_taxonomy
Remember – XX is your site number and the wp_ can be something different. If your old site is wp_ and the new one is something else, use the new site’s information. So if your new site’s prefix is “blog_”, then you search and replace to “blog_XX_posts”
The only time you do not use XX is when you are planning to send this data to the parent website.
One More Search and Replace for Your Images:
Once you are done with your tables, we need to fix one more thing:
- {domain}/wp-content/uploads/ = {domain}/wp-content/uploads/sites/XX/
If you do not change the images path to the proper folder, your images will show up broken. Also, if you’re changing domain names, you want to use the new domain name in the change. If that is the case, you might want to do one more search/replace for the old domain – the new domain.
Now that your MySQL data is good, its time to bring it into the multi site.
Step 6: Plan for Import
Before you can import these 5 tables into the new locations, you must remove the existing tables first. I backed up those tables, then dropped them from MySQL.
- DROP wp_XX_postmeta from {your database}
- DROP wp_XX_posts from {your database}
- DROP wp_XX_terms from {your database}
- DROP wp_XX_term_relationships from {your database}
- DROP wp_XX_term_taxonomy from {your database}
Step 7: Import New Version of Tables
When you are done dropping tables, it’s time to Import your data. Once again, it depends on the interface, but with phpMyAdmin there is an import option on the top. Of course, depending on the file sizes you are working with, you may have to split up your files and import separately. Consult with your web host for limitations.
Step 8: Clean Up Posts
Now its just a matter of going into your child site and checking for broken posts or links. I had a few images and two posts that had problems, I just went in and fixed them, then updated the post.
I had a couple ghost categories stick around. Those are found in the wp_XX_terms. Do a search for the category and remove it. I had a ghost category because I merged two categories into one. By removing it from wp_XX_terms the category went away.
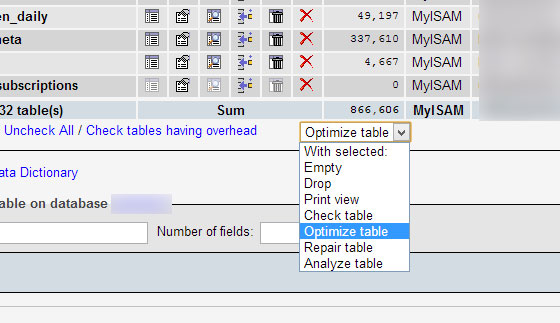
Step 9: Optimize – Repair
You might want to get used to doing this on a regular basis anyway. By optimizing and repairing tables, it makes sure you don’t have any weird characters or hiccups in the tables.
It’s also a good idea to backup your data (especially new posts) for the next few weeks. Like I said, this is not a clean way to export/import; it IS a sane way to do it.
Step 10: Enjoy Your New Website Location!
When its all said and done, you will have a new spot for your data. At this point you should be able to remove any plugins that you installed only for the transfer. Like I said before – if you used the EXACT SAME settings in Powerpress, the data should be there – images, enclosures and all.
Questions? Feel free to ask below. If you found this helpful – Please send me a tip!


