Partitioning and Sharing My New Drive: GParted and Samba (Updated)
Update 1: After experimenting with the networked drive over my network, I was unsatisfied with the functionality; I could copy to and from it, but I could not delete or rename files remotely. I wanted this functionality because this is drive for backing stuff up from various other computers on the network; there’s nothing on there, like for example a super-secret database, that needs to be protected from network users (both of us) and it’s locked down tighter than a drum from the inner tubes.
I fixed this by adding “rw” (for read/write) to the fstab entries (see below) so that they now read “auto,user,rw” instead of “auto,user,” then unmounting and remounting the drives. See below for more on the fstab.
Original Post
My new two terabyte external USB SATA hard drive arrived Thursday evening. I partitioned and formatted it, shared it over my network; I’m back in business with a backup drive.
The drive came formatted for NTFS. I could see it, but I could not use it; this is why:
There are NTFS drivers for Linux, but they were not included out-of-the-box with Debian, the distro I’m using on this computer; Debian is aggressively free and open source and does not include some of the free-but-not-necessarily-completely-open software found in many other Linux distros. This really didn’t matter to me, as I was planning to format it with a native Linux file system anyway–I don’t expect ever to connect it directly to a Windows box.
Note: Everything described below must be done with “root” (in Windows terms, “administrator”) privileges.
To set it up, I used the Gnome Partitioning Editor (GParted for short). I must say, it worked smoothly–as smoothly as, if not more smoothly than Partition Magic, which I used back in the Windows 2000/XP days to set up computers for training classes.
Using command line tools requires two separate operations:
- Partitioning the drive.
- Creating the file system(s).
GParted combines both of these into one coordinated interface.
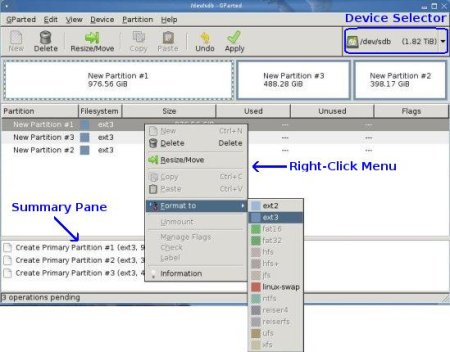
To select the drive to partition, use the selection dialog in the top right corner. Since this drive the second SATA drive in the system, it appeared as /dev/sdb (the first drive is /dev/sda).
I highlighted the existing partition in the “Partition” dialog in the middle of the screen and used the right-click menu to delete it. I then used the right-click menu to create two new partitions (I played around with three, but decided against it) and to select the file system type–in this case, ext3.
No changes had been made at this point. The changes did not take place until I clicked the “Apply” item in the menu bar. Once “Apply” is clicked, the existing partition(s) are removed, making any data on them unusable, then the new ones are created and formatted.
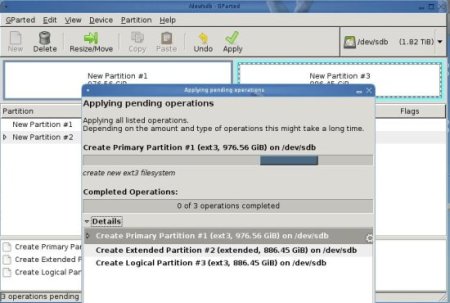
I clicked “Apply” and went to dinner. Formatting two-terabyte drives takes some time.
Now the partitions appeared as USB storage devices in my file manager, available to be mounted. I was almost done.
Because I want the partitions available to my network, I wanted to enter them into my file system table file (/etc/fstab), so that they always have the same mount points and always mount automatically upon restart.
When Linux senses a device, it links it to a file placed in the /dev (for “device) directory. To access it easily, though, a directory pointing to the device must be created in another directory, usually /media or /mnt (for “mount”).
So I created two directories in /media. To keep it simple, I gave them the same names as the partitions’ names, though I could have called them “Ralph” and “Fred,” had I wanted to. I then entered two lines in my /etc/fstab to represent them (fstab, like other *nix configuration files, is a text file that can be edited with any text editor).
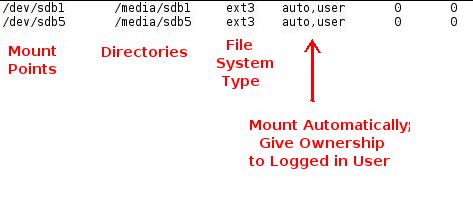
Now, when the computer boots up, it will always give these partitions the same names and mount them in the same virtual places.
You can learn more about the fstab file here.
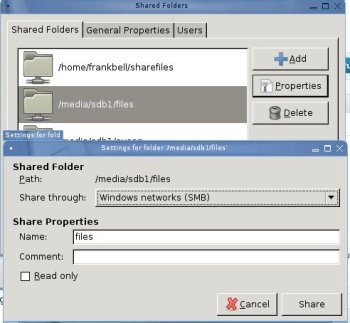
I wanted to create and configure folders on /media/sdb1 for sharing, while I use /media/sdb5 for other things. I created directories, then set up the sharing using the Gnome shares-admin tool. I used the add button to add the folder to the list, then configured it to be writable so I can copy stuff to it over the network.
The last step was to edit my samba configuration (/etc/samba/smb.conf) to make sure the configuration was as I wanted.
(Samba is a *nix suite for managing shares and making them visible to Windows as well as Linux. Samba can be very complex and I am no Samba guru. When I finally got a configuration that worked for me, I saved it in multiple locations and keep recycling it. The best how-to I’ve found for Samba is Samba by Example):
[global]
workgroup = workgroup
security = share
encrypt password = yes
smb passwd file = /etc/samba/smbpasswd
show add printer wizard = No
wins support = no[files]
path = /media/sdb1/files
guest ok = yes
read only = no
available = yes
browsable = yes
public = yes
writable = yes
I stopped and started the Samba daemon (or process) . . .
cd /etc/samba
smbd stop
smbd restart
. . . went to another computer, and there was my new network drive.
I’ve already put 112 GB or stuff on it.

