Sharing a Drive on My Network: IDE to USB to Linux
When I moved to Virginia Beach, I junked the IBM PC 300 I had been using as a file server. It was nearly 15 years old. I smashed the 8 GB boot drive with a hammer, wrapped up the 70 GB secondary drive in bubble wrap, and headed south.
I was planning to put the drive in my Dell Dimension 4700 running Slackware LInux 13.0, which I had been using as a webserver (the website is now out on GoDaddy), and use that as my file server. When I cracked open the Dell, though, there was no room in the carrier for another drive (it’s already got two). So I decided to investigate IDE to USB converter enclosures.
I found a converter enclosure from Dalco. Although the specs made no mention of LInux, I figured it was worth a shot. (For some fool reason, it came with an installation CD. Maybe I’ll throw it into a Windows box just to see whether it does anything other than clutter up the HDD with redundant electrons.)
The drive is now on line and available over the network. Here’s what I did:
(By the way, five years ago, hardly a word of this would have made any sense to me. Linux is not difficult to use. It’s just different.)
I mounted the hard drive in the enclosure, hooked it up, and tested it. (I learned long ago not to put the cover back on anything until I have tested it.)
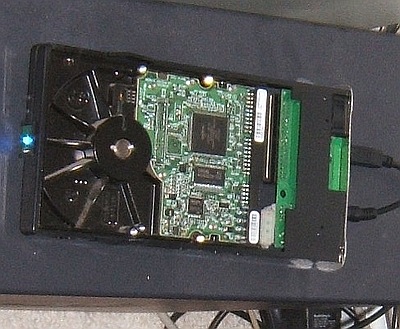
It auto-mounted and was visible in my file manager. If local access to it was all I wanted, I could have stopped there, but, to make it available over the network, I had to do several other things, and I had to do these as root (administrator for Windows users):
- F
- S
- Tab
-
2. Edit the share permissions for the drive to be shared.
-
3. Edit my /etc/samba/smb.conf (Samba configuration) file controlling visibility over the network.
Mount the drives under FSTAB
I ran a DMESG command to see how the computer is seeing the drives.
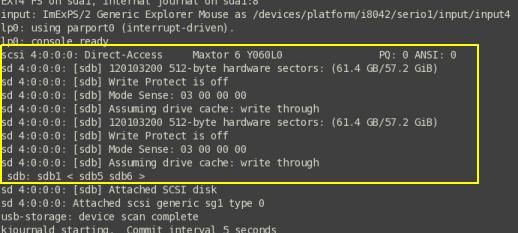
The crucial line is this one:

That tells me that the computer is seeing the single cable input from the USB enclosure as sdb1 (SCSI or SATA Drive B; the main hard drive is sda). That drive has two partitions seen as sdb5 and sdb6. I verified the identifications in a file manager. (I want to share sdb6, but I want both partitions in my fstab for ease of use.) As a matter of course, sdb5 and sdb6 exist in the /dev directory, the default Linux directory for devices. (Here is a good description of the Linux file structure.)
Fstab works by linking a device to a directory, so I have to create a directory for each partition. I could have created the directories in either the default /media directory or the default /mnt (for “mount”) directory; these are fundamental directories that are part of the basic Linux file structure.
The common practice these days is to use the /media directory, so I used the “make directory” command to create two new subdirectories in /media. The directory names are arbitrary; I could have used spongebob and squarepants had I wished to:
- mkdir /media/usbide1
- mkdir /media/usbide2
In the fstab, I added two lines to link the directories in /media with the directories in /dev. The fstab is a text file that can be edited with any of the gazillion text editors available for Linux.:
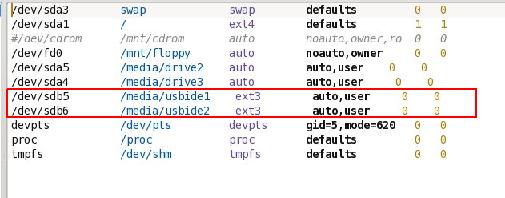
Here is an excellent explanation of the fstab.
Now I can mount the drives using their new names (I could have done this using a graphical file manager, but this way is faster):
- mount /media/usbide1
- mount /media/usbide2
I verified that they mounted by navigating to them with the cd (change directory) command and poking around with dir (list directory contents) command.
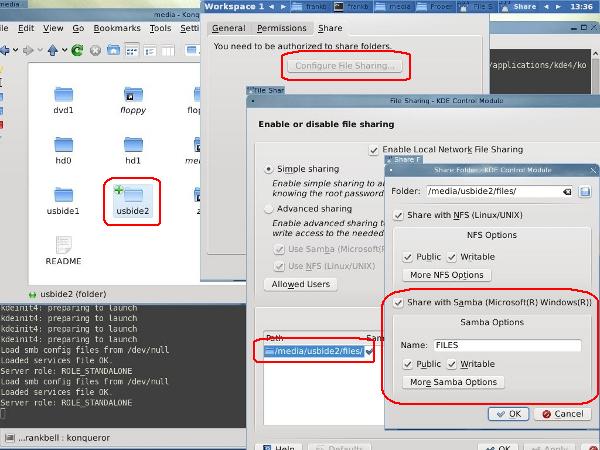
Edit the share permissions for the drive to be shared
This is faster in a graphical file manager; I prefer Konqueror for this (click for a larger image):
Edit my /etc/samba/smb.conf
Samba is program that enables file sharing among Windows, Linux, and Unix computers. (There are other methods of sharing just between Linux/Unix computers.) When I was first teaching myself Linux, I probably struggled more with Samba than with anything else.
The resource that finally worked for me was Samba 3 by Example. Once I got a Samba configuration that worked, I backed up my smb.conf file in multiple locations so I wouldn’t have go through that struggle again.
I’m not doing anything fancy. I just want to be able to write to and retrieve from this drive from inside my local network, so all I had to do was update the path information in my saved smb.conf,
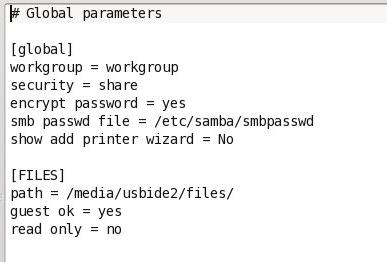
then set Samba to start automatically in my /etc/rc.d/rc.local file, which exists for calling programs to start automatically, by adding these lines:
A reboot proved that the Samba daemon (or background process–daemon is what the d in smbd stands for) was starting automatically.
Verify that the drive is visible on the network
It wasn’t. After intensive research (30 seconds with Startpage looking up the error message), I turned off my firewall and was able to see the drive.
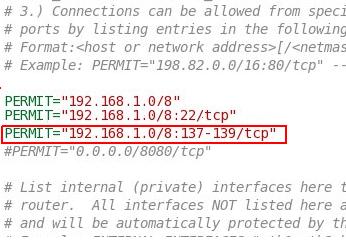
I had to poke a hole in my firewall for the TCP ports.
On this computer, I use an rc.firewall script to configure iptables on startup. I edited the relevant portion as shown:
My favorite Linux graphical front end for iptables is Firestarter.
I rebooted just to make sure everything was clean and bingo! I was in.
I can now back up and retrieve files between this here laptop and that there computer over in the corner by sending them over the network.
Now it’s time to put the case back on:
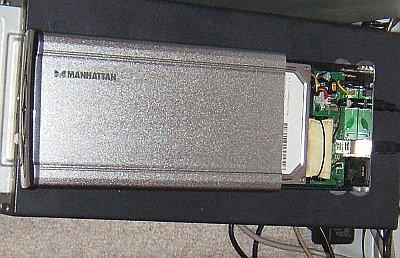
All done:


